Setting up the environment
In this section we will see how to setup the environment and the used tools for API testing.
Prerequisites
Add Reqnroll's extension for Visual Studio (and Visual Studio code)
- Go to Extensions -> Manage Extensions
- Search for Reqnroll for Visual Studio search for Reqnroll for Visual Studio 2022
- Download and install it
- Restart your IDE
Creating the client helper project step by step
In your cluster repository, create a new project called {cluster}ApiHelper in the following location: {cluster} / projects / ApiTests
Create a new file called {cluster}Client.constructor.cs in the same folder.
NSwag Studio
Introduction
NSwag Studio is a powerful, graphical user interface (GUI) tool designed to work with the NSwag toolchain, which is used for generating client code, API documentation, and various assets related to web API development. NSwag (short for "Not Swagger").
Installation
Go to NSwag Studio and download the latest version.
Using NSwag Studio
Make sure your Neos Cluster is running. On the manager, go to Documentation API. You should see all your API endpoints and their documentation generated by Swagger.
In your NSwag Studio application
You have two ways to generate your API client:
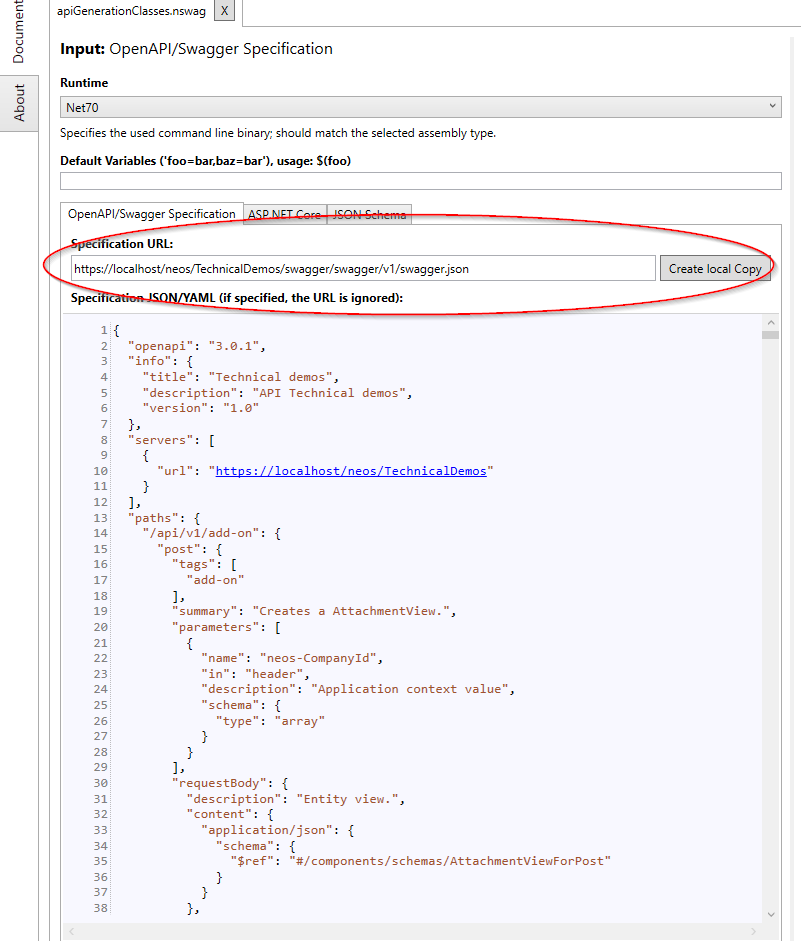
By using the Swagger Specification URL
You can find the URL in your Swagger's documentation page right under your cluster's name.
Then click on "Create Local Copy" to generate the JSON
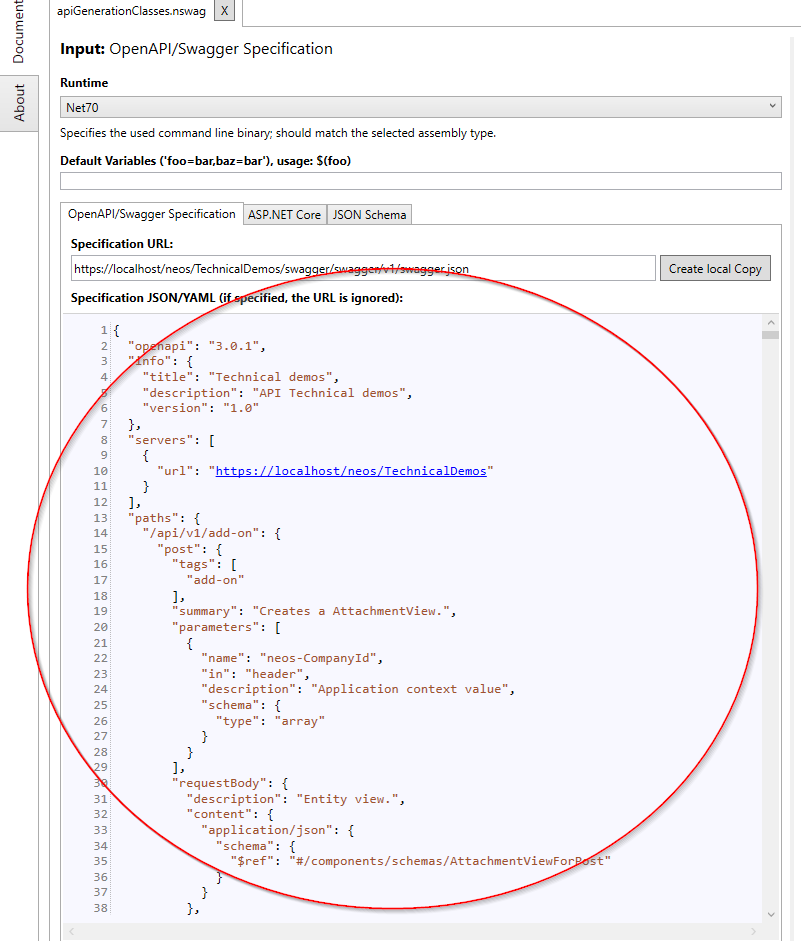
By using the JSON specification Swagger Specification JSON
The JSON specification is available in your Swagger's documentation page when you click on the URL under your cluster's name. Then you can copy the JSON specification and paste it in the Specification JSON/YAML field in NSwag Studio
Setting up the output
Check the output type "CSharp Client". Then go to settings. In the settings, you have several options to configure your output.
You can find the complete settings used and recommended by the Neos Team here
Important : Output file path: Is the path where your generated client will be saved. Specify the path to your {cluster}ApiHelper project.
Generate your client
Click on Generate Outputs and wait for the generation to finish.
Generate the file
You can generate the file by clicking on the Generate Files button.
You can find the generated file in the path you specified in the settings.
What to do with this file ?
(File generated with the Json of a Cluster in 1.19.0)
First of all, you will find the Client class, which is the main class of your generated client.
 public partial class TechnicalDemosClient
    {
    #pragma warning disable 8618 // Set by constructor via BaseUrl property
        private string _baseUrl;
    #pragma warning restore 8618 // Set by constructor via BaseUrl property
        private System.Net.Http.HttpClient _httpClient;
        private static System.Lazy<Newtonsoft.Json.JsonSerializerSettings> _settings = new System.Lazy<Newtonsoft.Json.JsonSerializerSettings>(CreateSerializerSettings, true);

        public TechnicalDemosClient(System.Net.Http.HttpClient httpClient)
        {
            BaseUrl = "https://localhost/neos/TechnicalDemos";
            _httpClient = httpClient;
        }

        private static Newtonsoft.Json.JsonSerializerSettings CreateSerializerSettings()
        {
            var settings = new Newtonsoft.Json.JsonSerializerSettings();
            UpdateJsonSerializerSettings(settings);
            return settings;
        }

        public string BaseUrl
        {
            get { return _baseUrl; }
            set
            {
                _baseUrl = value;
                if (!string.IsNullOrEmpty(_baseUrl) && !_baseUrl.EndsWith("/"))
                    _baseUrl += '/';
            }
        }
Then you will find the entity view models of your cluster.
Let's take a simple example with the Product entity view model.
Each entity view have three classes, one for each API call (GET, POST, PUT).
    [System.CodeDom.Compiler.GeneratedCode("NJsonSchema", "14.0.1.0 (NJsonSchema v11.0.0.0 (Newtonsoft.Json v13.0.0.0))")]
    public partial class ProductViewGetModel
    {
        [Newtonsoft.Json.JsonProperty("id", Required = Newtonsoft.Json.Required.Default, NullValueHandling = Newtonsoft.Json.NullValueHandling.Ignore)]
        public int? Id { get; set; } = default!;

        [Newtonsoft.Json.JsonProperty("name", Required = Newtonsoft.Json.Required.Default, NullValueHandling = Newtonsoft.Json.NullValueHandling.Ignore)]
        public string? Name { get; set; } = default!;

        [Newtonsoft.Json.JsonProperty("rowVersion", Required = Newtonsoft.Json.Required.Default, NullValueHandling = Newtonsoft.Json.NullValueHandling.Ignore)]
        public byte[]? RowVersion { get; set; } = default!;

    }

    /// <summary>
    /// Represents Product.
    /// </summary>
    [System.CodeDom.Compiler.GeneratedCode("NJsonSchema", "14.0.1.0 (NJsonSchema v11.0.0.0 (Newtonsoft.Json v13.0.0.0))")]
    public partial class ProductViewPostModel
    {
        [Newtonsoft.Json.JsonProperty("name", Required = Newtonsoft.Json.Required.Always)]
        [System.ComponentModel.DataAnnotations.Required]
        public string Name { get; set; } = default!;

    }

    /// <summary>
    /// Represents Product.
    /// </summary>
    [System.CodeDom.Compiler.GeneratedCode("NJsonSchema", "14.0.1.0 (NJsonSchema v11.0.0.0 (Newtonsoft.Json v13.0.0.0))")]
    public partial class ProductViewPutModel
    {
        [Newtonsoft.Json.JsonProperty("id", Required = Newtonsoft.Json.Required.Always)]
        public int Id { get; set; } = default!;

        [Newtonsoft.Json.JsonProperty("name", Required = Newtonsoft.Json.Required.Always)]
        [System.ComponentModel.DataAnnotations.Required]
        public string Name { get; set; } = default!;

        [Newtonsoft.Json.JsonProperty("rowVersion", Required = Newtonsoft.Json.Required.Default, NullValueHandling = Newtonsoft.Json.NullValueHandling.Ignore)]
        public byte[]? RowVersion { get; set; } = default!;

    }
NSwag studio generates a client and this client is a partial class. A partial class is a C# feature that allows a class to be defined in multiple files. Each part of the partial class is identified with the partial keyword, and the parts are combined into a single class during compilation. This allows for splitting the definition of a class across multiple files, which can be useful for organizing and separating concerns.
It's useful as the client already have some methods, Ready to be implemented in another another partial class in another file for example.
        partial void PrepareRequest(System.Net.Http.HttpClient client, System.Net.Http.HttpRequestMessage request, string url);

        partial void PrepareRequest(System.Net.Http.HttpClient client, System.Net.Http.HttpRequestMessage request, System.Text.StringBuilder urlBuilder);

        partial void ProcessResponse(System.Net.Http.HttpClient client, System.Net.Http.HttpResponseMessage response);
Completing the constructor.cs file
The constructor file should be a partial class. It allows you to add your own methods and logic to the {cluster}client.
{ClusterName}Client.Constructor.cs
    public partial class {ClusterName}Client
    {
        public {ClusterName}Client({ClusterName}ClientOptions options)
            : this(new HttpClient(new UntrustedCertClientFactory().CreateMessageHandler()))
        {
            BaseUrl = Environment.GetEnvironmentVariable("YOUR_VARIABLE") ?? BaseUrl;

            string? neosAutomationHeaderValue = BuildAutomationHeaderValue(options);
            if (neosAutomationHeaderValue != null)
            {
                _httpClient.DefaultRequestHeaders.Add("Neos-Automation", neosAutomationHeaderValue);
            }
        }

        public int StatusCode { get; private set; }

        partial void ProcessResponse(HttpClient client, HttpResponseMessage response)
        {
            StatusCode = (int)response.StatusCode;
        }

        private static string? BuildAutomationHeaderValue({ClusterName}ClientOptions options)
        {
            string? value = null;

            if (options.UserIdentifier != null)
            {
                value = options.UserIdentifier;

                if (options.UserEmail != null)
                {
                    value += $",{options.UserEmail}";
                }

                if (options.UserFirstName != null)
                {
                    value += $",{options.UserFirstName}";
                }

                if (options.UserLastName != null)
                {
                    value += $",{options.UserLastName}";
                }
            }
            return value;
        }

        private class UntrustedCertClientFactory : DefaultHttpClientFactory
        {
            public override HttpMessageHandler CreateMessageHandler()
            {
                return new HttpClientHandler
                {
                    ServerCertificateCustomValidationCallback = (sender, certificate, chain, _sslPolicyErrors) => true
                };
            }
        }
    }
Create the {ClusterName}ClientOptions class
create a new file called {ClusterName}ClientOptions.cs in the same project.
    public class {ClusterName}ClientOptions
    {
        public string? UserIdentifier { get; set; }
        public string? UserEmail { get; set; }
        public string? UserFirstName { get; set; }
        public string? UserLastName { get; set; }
    }
Explanations
The fact that the client is a partial class allows us to add our own methods to include some logic in the client.
Above, an example of the usage of the partial, we are completing the partial class ProcessResponse to get the statusCode of the requests we are sending.
The UntrustedCertClientFactory is a class that allows us to bypass the SSL certificate validation. It is useful when you are working with a self-signed certificate like you can do if you plan to execute your tests in a pipeline.
The {ClusterName}ClientOptions class is a class that allows us to bypass the authentication of the cluster. However it is not recommended to use it in production and it wouldn't work if the cluster is using a different authentication method like Azure ADB2C.
Creating the test project
The location of the tests should have a structure similar to the UI tests.
"{cluster} / modules / {theModuleYouWantToTest} / apiTests / {nameOfTheModule}.ApiTests"
It should give something like this :
technicaldemos/modules/Core/apiTests/Products
Creating a new solution
- Open Visual Studio
- Go to File -> New -> Project
- Search for Reqnroll and select Reqnroll Project
- Name your project and click on Create
- Select .NET 8 as target framework
- Select Xunit as unit test provider
Adding the client helper to your test project
- Right-click on your test solution and select Add -> Existing Project
- Select the {cluster}ApiHelper.csproj file
- Add the reference to your test project
Your project is ready !